內文是以 20.04 LTS 為示範,我用 22.04 LTS 照著 run 一遍確認可行~!
Tag: Ubuntu
-
在Ubuntu Linux上擴充虛擬機的邏輯分割區
流程說明
- 檢查磁區:使用 lsblk 命令來檢查磁碟設備名稱與分割區位置。
- 更改硬碟容量:將虛擬機硬碟從原始大小擴充至新的大小,例如從8G到16G。
- 擴充分割區:使用 growpart 命令來擴充分割區,並確認變更後的大小。
- 擴充檔案系統:執行 pvs 和 pvresize 來擴充物理分割區,然後用 lvextend 擴充邏輯分割區並整合所有可用空間。
以下以 UBuntu 22.04 使用單顆虛擬硬碟,並使用安裝程式預設的磁碟分割方式所建立的虛擬機器為例:
1. 刪除虛擬機器的快照並合併硬碟 (不做會無法更動硬碟容量)
2. 設定虛擬機器所需要的硬碟容量
3. 重啟虛擬機器(不重啟系統認不到擴充後的容量):reboot
4. 檢查磁區:lsblk
5. 擴充硬碟容量:sudo growpart /dev/sda 3
6. 檢查磁區確認硬碟是否已擴充:lsblk
7. 再次重啟虛擬機器(我的情況是不重啟無法擴充檔案系統):reboot
8. 擴充檔案系統:sudo pvs
9. 擴充檔案系統(續):sudo pvresize /dev/sda3
10. 檢查檔案系統是否已擴充:lsblk
11. 擴充邏輯分割:sudo lvextend -r -l +100%FREE /dev/mapper/ubuntu–vg-ubuntu–lv
12. 檢查邏輯分割是否已擴充:lsblk
13. 重啟虛擬機器已確認系統是否運作正常無誤:reboot
14. 檢查所有確認硬碟分割設定是否正確無誤:lsblk
-
About 關於 Snap(Snapcraft)
Ubuntu 的 snap 是一種應用程式包管理系統,它允許開發者和用戶更容易地分發和安裝應用程式。snap 包含了應用程式和它們運行所需的所有依賴項,這樣可以在不同的 Linux 發行版上無縫運行。
Snap 版本分為幾個不同的通道,反映了不同的穩定性和開發階段:
- stable: 最穩定的版本,適合所有用戶使用。如:sudo snap install wekan
- candidate: 候選版本,通常是接近穩定的,但可能還需要進一步測試。如:sudo snap install wekan –candidate
- beta: 測試版本,包含了即將發布的新功能,但可能還不夠穩定。如:sudo snap install wekan –beta
- edge: 最前沿的版本,通常是開發中的版本,可能包含未完成的特性或較多錯誤。如:sudo snap install wekan –edge
通常情況下,開發者會先在 edge 通道發布最新的更改,然後隨著問題的解決,逐步推送到 beta、candidate,最後是 stable 通道。這樣用戶可以根據自己願意承擔的風險程度選擇安裝不同通道的版本
MUbuntu’s snap is an application packaging system that allows developers and users to distribute and install applications more easily. Snap packages contain the application and all its dependencies, ensuring it can run seamlessly across different Linux distributions.
Snap versions are divided into several channels, reflecting different levels of stability and development stages:
- stable: The most stable version, suitable for all users. Ex: sudo snap install wekan
- candidate: A release candidate version, usually close to stable but may require further testing. Ex: sudo snap install wekan –candidate
- beta: A beta version that includes upcoming features but might not be stable enough. Ex: sudo snap install wekan –beta
- edge: The cutting-edge version, often in development, which may include incomplete features or more errors. Ex: sudo snap install wekan –edge
Typically, developers release the latest changes in the edge channel first, and as issues are resolved, they progressively push updates to the beta, candidate, and finally the stable channel. This allows users to choose which version to install based on the level of risk they are willing to take.
-

How to put file from windows to Ubuntu
Transferring files from Windows to Ubuntu can be done in several ways. Here are a couple of methods:
1. Using SCP (Secure Copy Protocol):
- Install an SCP client on your Windows machine, such as PuTTY’s
pscp. - Use the following command format in your Windows command prompt:
pscp <Source_File> <Linux_Username>@<Destination_Address>:<Destination_Directory> - For example, to transfer
file.txtfrom the C drive to the home directory of a user namedubuntu_useron the Linux machine with IP address192.168.1.10, you would use:pscp C:\file.txt ubuntu_user@192.168.1.10:/home/ubuntu_user/ - You will need to authenticate with the Linux machine to complete the transfer.
2. Using WinSCP:
- Install WinSCP on your Windows machine.
- Open WinSCP and enter the credentials of your Ubuntu machine.
- Drag and drop files from the Windows interface to the Ubuntu interface within WinSCP to transfer them.
Remember to have an SSH server installed on your Ubuntu machine for these methods to work. You can install it using the command:
sudo apt install openssh-serverChoose the method that best suits your needs and follow the instructions to transfer your files. If you’re transferring files between systems in a VirtualBox environment, you can also set up a shared folder in VirtualBox Manager and mount it in Ubuntu.

How to put file from windows to Ubuntu - Install an SCP client on your Windows machine, such as PuTTY’s
-

免費的卡片式看板管理軟體 Wekan
超過2000多人萬使用的Trello看板服務,又要增加對免費用戶的限制了。上次限制工作區的看板數量,還可以透過內容分類的方式拆分工作區;這次限制工作區成員人數10人,就讓原本多人免費使用的情境,不得不改成付費了…
當然,除了老實付費或是移轉至其他服務平台外,也可以自行架設開源的看板軟體。而自行架設開源(免費)看板服務的方案,對於使用人數多的組織來說,是頗具吸引力的做法。
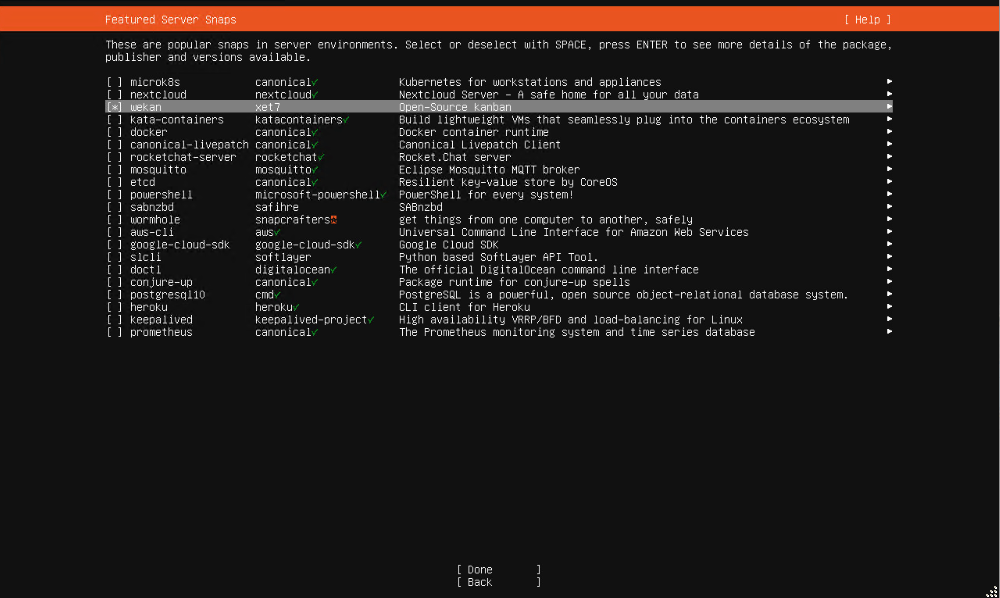
免費的看板管理軟體,首推持續穩定發展的 Wekan。不僅使用介面和 Trello 相近,也多了一些原本 Trello 需要訂閱才能開啟的功能。佈署上也十分容易,uBuntu Server 22.04 安裝時就可以直接選用安裝!
Wekan 基本設定
snap set wekan mongodb-bind-ip="0.0.0.0" #Allow IP access, here allows anyone to access.
snap set wekan root-url='http://192.168.1.7' # Set the access address URL, change it to your device’s IP.
snap set wekan port='80' #Set the external access port.
snap set wekan mail-url='smtp://username:password@smtp.mailserver.com.tw:465
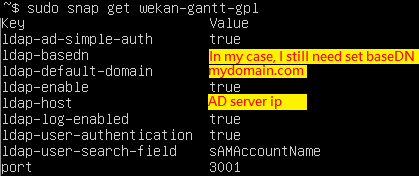
snap set wekan mail-from='brassaikao@outlook.com'LDAP 設定
sudo snap set wekan ldap-enable='true'
sudo snap set wekan default-authentication-method='ldap'
sudo snap set wekan ldap-port='389'
sudo snap set wekan ldap-host='192.168.1.1'    #AD Server
sudo snap set wekan ldap-basedn='OU=domain users,DC=test,DC=com'  #AD Structure
sudo snap set wekan ldap-login-fallback='false'
sudo snap set wekan ldap-reconnect='true'
sudo snap set wekan ldap-timeout='10000'
sudo snap set wekan ldap-idle-timeout='10000'
sudo snap set wekan ldap-connect-timeout='10000'
sudo snap set wekan ldap-authentication='true'
sudo snap set wekan ldap-authentication-userdn='CN=user,OU=test,OU=domain users,DC=test,DC=com'  #AD user structure as full level
sudo snap set wekan ldap-authentication-password='password'  #AD auth password
sudo snap set wekan ldap-log-enabled='true'
sudo snap set wekan ldap-background-sync='true'
sudo snap set wekan ldap-background-sync-interval='every 1 minute'
sudo snap set wekan ldap-background-sync-keep-existant-users-updated='true'
sudo snap set wekan ldap-background-sync-import-new-users='true'
sudo snap set wekan ldap-encryption='false'
sudo snap set wekan ldap-user-search-field='sAMAccountName'
sudo snap set wekan ldap-username-field='sAMAccountName'
sudo snap set wekan ldap-fullname-field='tw'
LDAP AD Simple Auth (親測推薦👍)
-

nano 文字編輯器常用熱鍵
nano 是目前 Ubuntu Server 標準安裝下預裝的文字編輯器。相較於 vim 的操作,使用上較更為直覺。
• 執行指令:sudo nano {被編輯的檔案路徑}
• 畫面下方那一排: ^ 代表[Ctrl]鍵,M- 代表[Alt]鍵,例如:^X 代表 [Ctrl]+[X] 離開
• Ctrl+S 存檔
• Ctrl+O 另存新檔(Write Out)
• Ctrl+6 開始選取 (再按一次可取消)
• Alt+6 複製整列或選取範圍
• Alt+Del 刪除整行
• Alt+3 Comment/Uncomment
• Alt+/ || Alt+G 跳到指定行數
• Alt+W || F6 尋找
• Alt+Q 尋找下一個
• Alt+W 尋找上一個
• Alt+R 尋找並置換
• Alt+X 關閉下方 Help 提示
nano預設編輯畫面 -

Ubuntu Server 指令速查
指令速查表 
權限提升說明 安裝完 Ubuntu 後更新相關套件(就如同裝完 Windows 後要執行 Windows Update )
- sudo apt-get update:取得遠端更新伺服器的套件檔案清單。
- sudo apt-get -y dist-upgrade:更新套件。
- sudo apt-get clean:清除更新時所下載回來的更新(安裝)檔案。
- sudo apt-get autoremove:自動清除更新後用不到的舊版本檔案(舊的核心程式)。
系統開關機指令
- 格式:sudo shutdown {PARAMETER} {TIME} {MESSAGE}
- sudo shutdown -r:系統重新開機。
- sudo shutdown -h:讓系統停止運作關閉電源。
- sudo shutdown -c:取消關機指令。
- sudo shutdown -k:模擬關機,只會對使用者提出警告。
-
[Solved] .Net Core 在 Linux(Ubuntu) 連線 SQL 發生 SSL Handshake Error
# 問題描述 Issue #
.Net Core 5 程式使用 SqlClient 在 Linux (Ubuntu 20.04) 上連線較舊版本的 SQL Server 時,出現以下類似的錯誤訊息:
Error Microsoft.Data.SqlClient.SqlException: A connection was successfully established with the server, but then an error occurred during the pre-login handshake. (provider: SSL Provider, error: 31 - Encryption(ssl/tls) handshake failed)

# 問題原因 Reason #
1) 較舊版本的 SQL Server 不支援 TLS 1.2 或更新版本的傳輸加密,而 Linux 所使用的 OpenSSL 預設為 TLS 1.2 或更新版本。並進而 導致連線 Sql Client 無法與 SQL Server 進行加密傳輸。
2) .Net Core 5 程式使用的 Sql Client 經測試,在 Linux 上無法透過 Connection String 的 Encrypt=false 參數來強制關閉加密。

# 解決方法 Solution #
1) 編輯 OpenSSL 設定:sudo vi /etc/ssl/openssl.cnf
2) 在最上面(讓其他設定以此為基礎)加入:openssl_conf = default_conf
3) 接著加入以下設定:
[default_conf]
ssl_conf = ssl_sect

[ssl_sect]
system_default = system_default_sect

[system_default_sect]
MinProtocol = TLSv1
CipherString = DEFAULT:@SECLEVEL=1

4) 在 Connection String 中加入 TrustServerCertificate=true 以自動信任 SQL Server 的憑證。
5) 重啟 OpenSSL 服務 -
Ubuntu-Setup Samba
安裝套件
apt-get install update
apt-get install samba
停用samba服務
/etc/init.d/smdb stop
/etc/init.d/nmdb stop
設定檔
sudo vi /etc/samba/smb.conf
在文末加上要的分享資料夾
[SHARE]
path = /var/lib/share ;分享路徑
browseable = yes ;是否可瀏覽
read only = no ;是否唯讀
create mask = 0644 ;檔案遮罩
directory mask = 0755 ;資料夾遮罩
打開分享路徑的權限
chmod 777 /var/lib/share
(或設定user以及group…再改成chmod 770 /var/lib/share)
編輯完後,存檔並重新啟動samba
/etc/init.d/samba start
如果需要設定帳號密碼才能使用,
除了在smn.conf把security設定成user外
亦需新增使用者:
sudo smbpasswd -a 帳號
編輯完smb.conf後用testparm檢查
testparm
啟用samba服務
/etc/init.d/smdb start
/etc/init.d/nmdb start
