# 問題描述 Issue #
.Net Core 5 程式使用 SqlClient 在 Linux (Ubuntu 20.04) 上連線較舊版本的 SQL Server 時,出現以下類似的錯誤訊息:
Error Microsoft.Data.SqlClient.SqlException: A connection was successfully established with the server, but then an error occurred during the pre-login handshake. (provider: SSL Provider, error: 31 - Encryption(ssl/tls) handshake failed)

# 問題原因 Reason #
1) 較舊版本的 SQL Server 不支援 TLS 1.2 或更新版本的傳輸加密,而 Linux 所使用的 OpenSSL 預設為 TLS 1.2 或更新版本。並進而 導致連線 Sql Client 無法與 SQL Server 進行加密傳輸。
2) .Net Core 5 程式使用的 Sql Client 經測試,在 Linux 上無法透過 Connection String 的 Encrypt=false 參數來強制關閉加密。

# 解決方法 Solution #
1) 編輯 OpenSSL 設定:sudo vi /etc/ssl/openssl.cnf
2) 在最上面(讓其他設定以此為基礎)加入:openssl_conf = default_conf
3) 接著加入以下設定:
[default_conf]
ssl_conf = ssl_sect

[ssl_sect]
system_default = system_default_sect

[system_default_sect]
MinProtocol = TLSv1
CipherString = DEFAULT:@SECLEVEL=1

4) 在 Connection String 中加入 TrustServerCertificate=true 以自動信任 SQL Server 的憑證。
5) 重啟 OpenSSL 服務
Category: Tech
IT Technology, 3C, AI
-
[Solved] .Net Core 在 Linux(Ubuntu) 連線 SQL 發生 SSL Handshake Error
-
Aras Innovator – Update parent ItemType Property by Relationship 透過單身欄位的 JavaScript 更新單頭欄位
// Sample: Update custom Part field [total_qty] by edit relationship item property [qty] on CellChange event.
var itmPart = typeof(parent.document.thisItem) == "object" ? parent.document.thisItem : parent.thisItem;
var rels = itmPart.getRelationships("Part BOM");
var count = rels.getItemCount();
var inn = itmPart.getInnovator();

var totalQty = 0;
for (var i = 0; i < count; i++) {
    var rel = rels.getItemByIndex(i);
    totalQty = totalQty + parseInt(rel.getProperty("qty", "0"));
}

var qty = getRelationshipProperty(relationshipID, "qty");
itmPart.setProperty("total_qty", totalQty);
setTimeout(function(){ aras.uiReShowItem(itmPart.getID(), itmPart.getID()); }, 100); -
如何將Windows 11開始工作列的位置,從置中改成傳統的靠左
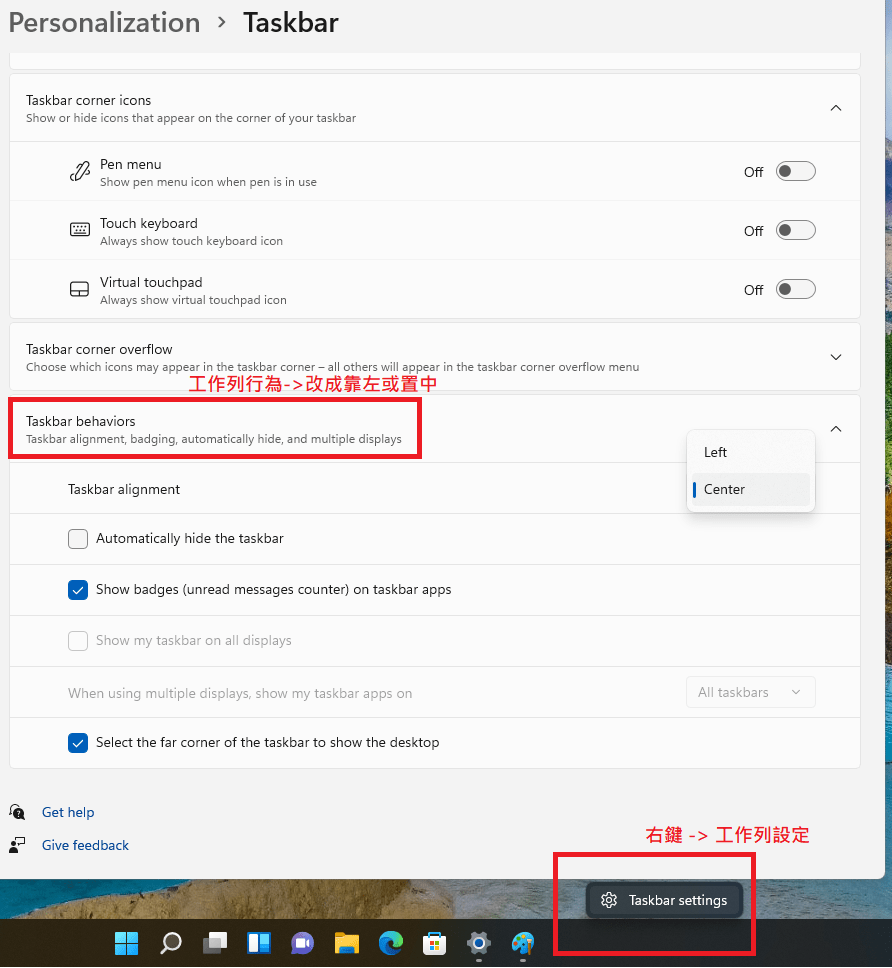
How To Change Start Taskbar To Left Side Like Windows10:
Right Key on Start Taskbar -> Taskbar Settings -> Taskbar behaviors -> Left -
電話交換機筆記 PBX Private Branch Exchange
- FXS Foreign eXchange Station (Phone) 接類比電話或PBX電話交換機的外線port
- FXO Foreign eXchange Office (Line) 接PSTN Public Switched Telephone Network公用交換電話網路的電話線路
-
Force Install Windows 11 透過修改登錄檔強制安裝
由於Windows 11 的安裝程式會偵測 CPU, TPM 2.0模組, 信賴開機(Secure Boot) 等硬體環境。故不管是仿間甚至是微軟官方的強制安裝教學,都是透過修改安裝程式使用的登錄檔參數,來跳過檢查或是准許使用不支援的硬體環境。
其中,如果是升級既有系統的話,則修改既有系統的登錄檔,[Win]+[R]叫出執行視窗後輸入regedit;如果是安裝光碟/USB 全新安裝的話,則是在安裝畫面中按下[Shift]+[F10]以叫出「命令提示字元」後輸入regedit。
要修改的登錄檔機碼如下(可能需自行新增Key值或參數名稱):
如果電腦完全沒有TPM模組,也可以透過直接刪除安裝USB或光碟內的 source\appraiserres.dll來完全跳過硬體檢查。
- 跳過TPM檢查
- HKLM\System\Setup\LabConfig\
- BypassTPMCheck
- DWORD:1
- 跳過信賴啟動(Secure Boot)檢查
- HKLM\System\Setup\LabConfig\
- BypassSecureBootCheck
- DWORD:1
- 准許在不支援的TPM和CPU下升級
- HKLM\System\Setup\MoSetup\
- AllowUpgradesWithUnsupportedTPMOrCPU
- DWORD:1
- 跳過TPM檢查
